Showing posts with label scraplift. Show all posts

Wednesday, April 8, 2026

You A Maze Me


I'm in the middle of catching up on projects that have been shared on my facebook page but not here, so here we go --- 
This layout was made in May 2024 as part of a cyber crop challenge from  Scrapbook Fantasies .


You A Maze Me


The first challenge inspiration for the past Cyber Crop over at Scrapbook Fantasies was to use the three Primary colours.
I chose to use the fabulous “Imagine With Alice” collection..
Using the yellow & white chevron paper for the base, adding paint on a foam brush.. Layering with plenty of white spray mist and some stencilling with red & blue circles.
The rest was pretty easy with some fussy cutting pieces around the Red Glitter photo mat.
The photo features my amazing boys during a holiday adventure visit to a Maze park on the Sunny Coast a couple years ago. (hidden journaling on the backside of the layout)

I'm so thankful that Alicia, Quentin and the Redshaw saw the spark in me back in 2024 to get back into crafting. Unfortunately it fell flat pretty quickly afterwards, but I'm not back at it. April 2026.. I am trying to catch up on posting / uploading projects and working on plenty of new one's as well. 


This was a challenge inspired layout using Red / Blue / Yellow.
I was in the car on the way down to Maryborough actually when I saw the challenges released during the Cyber Crop at Scrapbook Fantasies over the weekend.
As I sat there scrolling through FB, I read this challenge and knew straight away I wanted to scraplift one of my own designs from a few years ago.
I wasn’t sure if it’d work out or not. And I will admit it took me a couple of goes to create the base, but I am certainly loving it now!
Very easy techniques on this page done well is what makes this so eye catching for a basic layout. Simple allows the design to tell the story.
Which this does beautifully for our memories.
The photo captures my boys visiting a Maze world on the Sunshine Coast.
It has loads of extra puzzles & games. Fun family themes with some fairy tale’s featured for a fun & whimsical experience.
It’s great when a strong feminine vibed collection like this “Imagine With Alice” can be flipped to suit a great boys themed layout too.

Let me know what you think! 
Thanks for your time, Happy Scrapping.. 

Tuesday, April 30, 2024

Magical Memories - Added Easel

* SCRAPLIFT   INVITE *

A few weeks ago I was so honoured to be allowed to promote this Magical Memories collection from Scrapbook Fantasies as part of their audition process for their Creative Team. 
For me it has been the boost that I've needed to get out of the horrible hole I've been in and unable to go near my craft desk for the past year +.. 

Alicia, Quentin and the Redshaw have been friends for a long time and to feel the support from them at this tough time has been inspirational and heart warming. I hope that the support and promotion that I'm able to give now with their products is at the least a small part of paying them back for their kindness. 

So now I would like to invite the incredible members of the Scrapbook Fantasies Creative Families group to Scraplift this layout design and share with us in the facebook group. 
It's an easy and simple layout that anyone of any ability can put together using any of the exclusive collections by Alicia and Naomi-Jon.


This layout is one of many that I would love to share that has a special design technique element. 
I love putting new ideas onto layouts and showing others that it can be done with some imagination. 
I don't always get it right and quite often have to put quite a bit of thoughts into the logistics and measurements before I even begin.. Then I tend to get it wrong and have to wing it as I go along.. lol

Camel buddy

These photos capture my beautiful boys meeting and playing with a Camel calf a few years ago during our trip to the Gemfields. We were staying at a small caravan park called "Gemini", which happens to be right next to the Camel farm. 


I started off with a kraft cardstock piece as the base. You can use anything for this, as it won't be seen underneath!
Using Magical Memories # 5 - cut it in half 6"x12" with the solid tan piece, then cut in half again 3"x12". These will be adhered to the top and bottom of the base layout piece. 
Fussy cut the other side of Magical Memories # 5 for the embellishment cluster pieces. 

Grab a couple of White Cardstock pieces for highlighting and photo mating pieces. 
12"x6.5" - stick it down in the middle, making sure to go over the top of the solid tan strips. 
Cut two 5"x6" photo mats 
and one 5"x8" piece to be used for the easel. Score at 1" and 4.5"

Magical Memories 3 4 - Cut to layer on top of the middle white cardstock. 11.5"x6"

I had leftover scrap piece of solid tan from another layout that I used for the first photo mat on the left side, sandwiched with an off centre white mat and then photo on top. 

The easel 1" piece will go under the white middle layer piece. 
It will be lay over the top of the middle pattern paper layers. Fold creases. 
Add the white photo mat to the bottom section of the easel and then the photo on top too. 

Add the white journal piece and fussy cut clusters. 
To finish it off, blend on some spots using the Blotchy Spots stencil. 


Another very simple and basic layout that can be added to to create your own design. 
This is one that I've already got plans to scraplift myself again. 
If you would like to try out the idea, then please feel free to scraplift this yourself as well and share it in the Scrapbook Fantasies Creative Families facebook group. 

Magical Memories # 5
Magical Memories # 4 
Blotchy Spots Stencil

Progress video still to come! 


Let me know what you think! 
Thanks for your time, Happy Scrapping.. 


Wednesday, January 11, 2023

Grand Bazaar Card + Layout

You may recongise vaguely the design of this layout... It's actually one that I did many, many years ago but loved so much that I have scraplifted myself several times.. This time it was for a local class.. Again, another class that was a hit and extra kits with measurements & instructions had to be made up for crafters afar.. 


The collection is from Kaisercraft and with their two sided pattern paper the bold colours popped no matter which side was used.. 


Let me know what you think! 
Thanks for your time, Happy Scrapping.. 

Thursday, July 21, 2022

Adventure Right Here layout

 One of my most favourite layouts that I have created in the last 12 months.. This one was actually a WINNER at the local show in the "Landscape" category.. 

Using the 49 & Market - Hike More collection, it's actually a scraplift of a layout I created for a class taught in store last year. 

The photo captures my young man Hunter on top of a local Mountain popular with climbers and hikers. 


Let me know what you think! 
Thanks for your time, Happy Scrapping.. 

Wednesday, May 11, 2022

You were born to be an original

 You were born to be an original


WHITE WITH 1
One of my old DT challenge groups held a Cyber Crop over the weekend.. I thought I'd join in, as I love the EARTH theme.
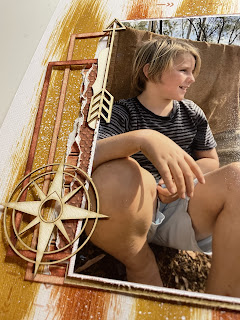
My challenge 1 entry - I have been wanting to use this paint technique for quite a while now when I saw it used as a rainbow. So thought, what better chance than now with some beautiful Burnt Sienna & Raw Sienna for this Earth Brown base.


I started the layout with a white cardstock base, then added the paint with dots in the middle of the page. Then with foam brushes I simply spread the paint from the inside out. Leaving gaps for the white to peek through between each paint stripe. 
Once the paint was dry, I added some white spray mist generously over the top. 
The TIP is for the paint to be dry first!!! 


You may wonder what the photo has to do with criteria 2 - exploring the outdoors, here we are in Sapphire at the Gem Fields (outback central Qld). Hunter is actually sitting on a mound of waste dirt that had been sifted through to find precious Gems.
It was an incredible experience and lucky to capture so many feature photos while we were on holidays there.


I have truly been absolutely BLOWN AWAY by the amazing positive feedback I have received from sharing this layout.. It was made back in March and it has been ongoing and such lovely comments.. 

I have been so impressed with all of the SCRAPLIFT pages that others have done based on my layout.. It's very cool.. :) 

chipboard - celebr8
torn layered pp - ciao bella 'collateral rust'
stencil - kaisercraft


Let me know what you think! 
Thanks for your time, Happy Scrapping.. 

Visit my on FACEBOOK to keep up to date with my projects in real time 

Scrap Crazy with Toni  


Monday, May 9, 2022

High Tea - Happy Mail penpal idea

 This was just a fun little project I put together featuring Uniquely Creative - High Tea collection.

The base design is loosely based on an idea from Alicia Redshaw at Scrapbook Fantasies.
However the measurements are mine and some design changes were made to not clash with copyright laws.


High Tea - Happy Mail penpal idea


You are welcome to use this project as an inspiration or scraplift if you’d wish!


This would make sure a great little Happy Mail idea to send to a Penpal. It would hold quite a bit of goodies as it’s 1” wide in the holder / pocket area.


Let me know what you think! 
Thanks for your time, Happy Scrapping.. 

Visit on FACEBOOK to keep up to date with my projects in real time 

Scrap Crazy with Toni  


Monday, May 2, 2022

Vacation Time - Let's Get Sketchy DT


VACTION TIME


As soon as I saw this sketch, I knew I wanted to do something special with some rub-ons. 
So I grabbed the 49 & Market - Beached collection and went to work.. 
I honestly fell down the rabbit hole with this layout and wanted to keep going and going... lol
The more the eyes wonder over this layout, the more you'll find. 


-- PROGRESS PHOTOS - PUTTING THE LAYOUT TOGETHER -- 

To make sure the triangles are all the same size, I made myself a little template. 
3 1/4" x 4 rectangle piece of scrap. 
3 1/4 - tall
on the top edge, measure in 2" and place a pencil dot (center). 
Then cut from each bottom corner to the center dot on the top edge to create the triangle. 


Mark little dots / lines on the left side of the triangles and then remove. These are simple marker dots so you have a guide on where to place the rub-ons so they look like they are partly behind the pattern paper triangles. 


I really enjoyed the layering of the rub-ons.. However, I did make a little mistake - can you spot it? lol

To make sure I got the triangles laid straight across the layout, I used a T Ruler.. 


 Thanks so much for dropping by! Make sure you head on over to the Let's Get Sketchy challenge blog or facebook page for more inspiration for our amazing DT! 

Let your creativity flow and hope to see your linked up entry soon! 
Toni.. xoxo


Follow more updates on - 

Friday, April 29, 2022

Peppermint Kisses scraplift layout

Peppermint Kisses layout 

Another to share in my Scraplift layout series. This time using an very old collection Peppermint Kisses by Kasiercraft.. It is a Christmas based collection, so it made the trail of presents a fun little element for the scraplift design. 


Let me know what you think! 

Thanks for your time, Happy Scrapping.. 

Visit my FACEBOOK to keep up to date with my projects in real time 

Scrap Crazy with Toni