Showing posts with label grab & go. Show all posts

Wednesday, May 4, 2022

4 different male themed cards

 Well, well, well.. 

Welcome back.. Today I'm sharing with you something a bit different.. Something that many of us seem to struggle so badly with but never seem to know or understand why.. lol

MALE CARDS


Each of these cards are unique with their own style.

 I find that using a specialty themed paper and elements it makes putting together male cards so much easier! 

I have used the Uniquely Creative - Drive & Fly collection to make them all. 

6x6 square card - 4x6 regular card - 8x4 slimline card - 2.5x6 tag base

Made these easy cards with the 6x6 paper pack, metal cogs, wooden cogs & embellishment diecut pack.


CARD 1 - 6x6 square base


CARD 2 - 4x6 regular card base


CARD 3 - 8x4 Slimline card base


CARD 4 - Tag base


Let me know what you think! 
Thanks for your time, Happy Scrapping.. 

Visit my on FACEBOOK to keep up to date with my projects in real time 

Scrap Crazy with Toni  


Wednesday, March 30, 2022

Rustic Christmas swap projects 2021

More Christmas 2021 catch up shares..

A few quick little projects made for multiple swaps following the criteria set for each…

They include - Pocket letter, Tags, ATC & ATCoins, bookmarks, box, memory dex, title size + smaller sized embellishment clusters and of course cards.


I used the Simple Stories - Rustic Christmas collection.
Even though I’ve made all of these, PLUS loads more that I packaged up before this video PLUS the layouts already shared - I still have loads of this collection still to play with.


Let me know what you think! 
Thanks for your time, Happy Scrapping.. 

Visit my on FACEBOOK to keep up to date with my projects in real time 

Scrap Crazy with Toni  

Saturday, March 26, 2022

Christmas cards 2021

 Still playing catch up with all of my Christmas projects from 2021.

Here are some of the cards that I made. Most were for swaps!


Let me know what you think! 
Thanks for your time, Happy Scrapping.. 

Visit my  FACEBOOK to keep up to date with my projects in real time 

Scrap Crazy with Toni  

Saturday, February 12, 2022

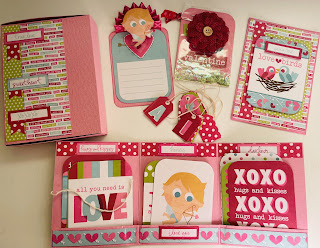
Valentines themed swaps 2022 - part 1

 Righto... I've got a couple of cute but VERY SIMPLE Valentines themed projects to share with you all.. These are all for swaps. 

Part 1 - 


And even thought this “Love Struck” collection is crazy OLD it just kept on giving & giving… I was able to also make a little heart token pocket purse thing. Seriously, so cute! 


Let me know what you think! 

Thanks for your time, Happy Scrapping.. 

Visit my on FACEBOOK to keep up to date with my projects in real time 

Scrap Crazy with Toni  

Saturday, December 19, 2020

Scraps Cards - Christmas - Twitchit Craft Kits

  Scraps Cards – made by Toni Herron for Twitchit Craft Kits


Christmas Traditional Kit 


These cards are so easy and perfect to use up all the fiddly bits leftover from kits.

Starting off with plain cardstock to create your usual card base. I used an A4 piece and cut in half at 5.3/4”. This then folded in half creates the card base at 5.3/4”x4”.  Heavily ink the edges of the card base.

Card topper- use a larger piece of cardstock from your scraps box. *tip- doesn’t matter what colour or pattern as it is about to be covered-  5.1/2”x3.3/4”. Stick double sided tape / glue to fully cover as much as possible. Now using all of your kit scraps, place each piece randomly to cover the whole topper base. It will look a little like a mismatch quilt design.  Once the whole base is covered, cut the overhang from the edges. Use some foam tape / 3D dots / cardboard behind and adhere to the card base. This will give a fun dimensional element to the card. Place a tag, fussy cut pieces or sentiment to the front of the card topper to finish off. 


Visit my on FACEBOOK to keep up to date with my projects in real time 

Scrap Crazy with Toni  

Tuesday, December 1, 2020

Grab and Go box with cards - Christmas - Twitchit Craft Kits

  Grab & Go box with cards– made by Toni Herron for Twitchit Craft Kits


Christmas Traditional Kit 


This is definitely one of the easiest open topped boxes you’ll ever put together.

Start off with a plain cardstock 12”x7.1/4”

Score the long side at 4.1/2”,  5.3/4”,  10.1/4” &  11.1/2”

Score the short side at 6”  &  7.1/4”

Fold all of the score lines, cut slits into the score lines on the bottom, now wrap the panels until they make a box. Glue the extra flap closed on the long edge. Bring up and glue the bottom panels to create a base. The box is now complete. 


For the cards to be easily seen and picked up, draw and cut a diagonal line across the top of the side panels. From back to front, by 1”

Decorate- Twenty Five Days 5.3/4”x4.1/4” + 2 Red/Green 1”x5.3/4” + Holiday Floral 4.1/1”x4.3/4

Ink all pieces to be used on this project. Finish off with a strip of washi tape on the back. 


PROJECT TWO – simple 5 minute cards

Starting with a plain cardstock 5.3/4”x8”  *tip A4 cut in half is perfect for a card base of 5.3/4”x4”

1.      Poinsettia 5.1/2”x3.3/4” + torn Holiday Floral *1.1/2x5.1/2”

Stick down the Poinsettia pattern paper as the first layer on the bottom. Then using some scraps, I have torn the edges of the red pattern paper. Stick down a strip on top of each card and finish off with a tag. Ink all edges. Use foam tape / 3D dots or cardboard to give the tags some dimension


      2Woodgrain 5.1/2”x3.3/4” + Holiday Floral 4.1/2”x3.1/4” + scraps for strips Twenty Five days and Red/Green and Berry Christmas

 Stick down the Woodgrain as the first layer.

 Create your topper as a second part. 

Using the red pattern paper as the base for the topper, glue down the strips of scrap papers onto the left side. Using some foam tape / 3D dots / cardboard added to the back of the sentiment piece. You can also use the foam tape to the back of the topper also to give extra dimension layers to this card. Ink all edges. 


3.    Woodgrain 5.1/2”x3.3/4” + Holiday Floral 5.1/2”x1” + Acetate 5.3/4”x4”

Measure down 1” from the middle crease. Cut the card there. Add Acetate to the inside of the flap panel to equal the length of the missing card. Add washi to the back of this panel.

On the front, add a pattern paper layer and washi over the top of the cut. Choose a sticker from the sticker sheet included in the kit, place it in the middle to replicate an invisible card front.

Stick the woodgrain to the inside of the card. This will create a background for the sticker on the front. 


Visit my on FACEBOOK to keep up to date with my projects in real time 

Scrap Crazy with Toni