Showing posts with label flag. Show all posts

Saturday, June 18, 2022

Happy - Beach grid layout

And there we go… Another layout finished.
This one us using Seize The Day collection - Uniquely Creative.
I am really impressed by how many projects I’m getting from this collection with still well over 75% of it that I haven’t used yet.
This is an entry into a fb challenge group that required the square pattern background & use of two photos..
I don’t always journal on the front of pages, sometimes I flip it over & write on the back. Just to keep the design aspect all pretty..


This is the perfect opportunity to share why I love to Distress & Ink edges so much.

You can see the huge difference there is with layering effects, dimension & textures when you take that extra l bit of time & effort to ink the edges.
Of course some layouts you may want the softer clean edges, but I like most of my layouts to have this extra element in them..


Let me know what you think! 
Thanks for your time, Happy Scrapping.. 

Monday, May 23, 2022

Be wise & free layouts

 Welcome back crafty friends and family.. I just wanted to share a quick layout featuring photos of my beautiful friend and her stunning daughter using the Wise & Free collection from Uniquely Creative.. 

And a second layout below without photos at the moment.. 

Be Wise & Free 


Friday, March 25, 2022

St Pat’s Day 2022 - How to Scraplift & add Fake layers

 Another fun layout to share with you featuring some St Pat's Day celebration.. 

This one is the second layout I made last week using the Lucky Charm collection by PhotoPlay. 

HOW TO SCRAPLIFT & ADD FAKE LAYERS - YOU TUBE VIDEO


This layout was all about scraplifting another layout I had designed and adding some fake layers using the adorable Lucky Charm collection.. 


I started off with a paint technique on the base with green and then added some orange spray mist over that once dried. 

Then it was into the scraps and tearing leftovers to design the layers under the photo mat. 
Please check the video for step by step.. 


Let me know what you think! 
Thanks for your time, Happy Scrapping.. 

Visit my  FACEBOOK to keep up to date with my projects in real time 

Scrap Crazy with Toni  


Sunday, February 13, 2022

Valentines themed project 2022 - part 2

 Valentines themed swaps

Part 2 


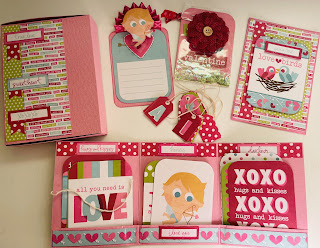
This swap project is using the PhotoPlay - Love Letters collection. 


Let me know what you think! 

Thanks for your time, Happy Scrapping.. 

Visit my on FACEBOOK to keep up to date with my projects in real time 

Scrap Crazy with Toni  

Saturday, February 12, 2022

Valentines themed swaps 2022 - part 1

 Righto... I've got a couple of cute but VERY SIMPLE Valentines themed projects to share with you all.. These are all for swaps. 

Part 1 - 


And even thought this “Love Struck” collection is crazy OLD it just kept on giving & giving… I was able to also make a little heart token pocket purse thing. Seriously, so cute! 


Let me know what you think! 

Thanks for your time, Happy Scrapping.. 

Visit my on FACEBOOK to keep up to date with my projects in real time 

Scrap Crazy with Toni  

Tuesday, March 30, 2021

Lasting Memories - 541 -

DT Button


541 - 


WILD


I dug deep for these super cute photos of Hunter when he was little at a local park enjoying the slide.. 

I used the Daydream collection from Cocoa Vanilla and an adorable Wolf pup and flag garland diecut from Scrapbook Fantasies.. It's a simple page but the focus highlights are balanced nicely without too much extras being added.. :) 


 Thanks so much for dropping by! Make sure you head on over to the Lasting Memories  layout challenges website for more inspiration for our amazing DT! 
Let your creativity flow and hope to see your linked up entry soon! 
Toni.. xoxo


Follow more updates on - 

YOUTUBE  

Monday, January 25, 2021

Lasting Memories - 532 - Events


DT Button

"Events" - Create a layout of an event you attended or hosted.  Perhaps it's a wedding, a birthday party, or a holiday party.  


Night to Shine


I was so truly lucky and blessed to be able to attend my son's school Formal last year.. (2020)
During all of the restrictions many schools cancelled their events, however his school took a poll from the kids and choose the best option to be able to hold the event would be to have the students and limited teachers only.. Thankfully as the "Parents & Friends" group, we were asked to assist the catering and wait staff for the night.. So myself, my Mother and a handful of other incredibly beautiful Mum's got to be involved.. 


This layout I wanted to do something a little more special and eye catching.. Using the Celebr8 "star gazer" collection, I made all 9 squares into shakers and then printed out small photos to attach over the top. Starting off the page with a white cardstock base and smooshing with some bronze ink..  Add the embellishments to finish off the page and it is one of my most favourites that I've done recently.. 


 Thanks so much for dropping by! Make sure you head on over to the Lasting Memories  layout challenges website for more inspiration for our amazing DT! 
Let your creativity flow and hope to see your linked up entry soon! 
Toni.. xoxo


Follow more updates on - 


Thursday, December 10, 2020

Twinchie card, Tag Holder, Flag Garland - Christmas - Twitchit Craft Kits

Twinchie card, Tag Holder, Flag Garland – made by Toni Herron for Twitchit Craft Kits


Christmas Traditional Kit 


PROJECT ONE – Twinchie card
Starting with a plain cardstock 6”x12” - Fold this in half to make a 6”x6” card base.
Distress and Ink around all edges of pieces to be used on this card.
For the first layer of squares, cut all 9 pieces to 1/8” under 2” = 1.7/8”x1.7/8” (use off cut pieces)
Second layer of squares, cut all 6 to 1/8” under first layer – 1.3/4”x1./34”  (use off cut pieces)

Lay them onto your card to create a topper design. Move and rotate pieces until happy with how they are laid out. Stick down the first layer then add some foam tape / 3D dots / cardboard to make the second layer pop to give dimension. Finish off card with some tags and stickers from the sticker sheet in the kit. 


PROJECT TWO – Flag Garland
Bottom layer  RED – 14 Red/Green 1.1/2”x2”
Middle layer GREEN –  14 Red/Green 1.1/4”x1.3/4”
Top layer WHITE WITH STRIPE – 14 Twenty Five Days  1”x1.1/2”
Cut a small 1/2" tail in each flag piece. Do this on ALL layers.


Now stick all layers together making 14 full flag pieces.
Add each letter  from the “MERRY CHRISTMAS” stickers on just a little bit lower from the top edge. This leaves room to poke some holes into each banner on the top sides and threading twine back and forth to create a hanging garland. 


PROJECT THREE- Accordion Tag Holder

Accordion - Festive Florals 6”x10”
Score long side at 2.1/2”,  5” &  7.1/2
Score short side at 4.1/2 – fold this up to make a pocket.

Add a brad onto the far left and right sides to secure the bottom flap up.
Add some washi tape for decoration.
Fill with tags from Christmas Tags pattern paper and fussy cuts from the bonus mystery sheets. 


Visit my on FACEBOOK to keep up to date with my projects in real time 

Scrap Crazy with Toni   

Friday, December 4, 2020

Flags, Tags and More box - Christmas - Twitchit Craft Kits

  Flags, Tags & More box – made by Toni Herron for Twitchit Craft Kits


Christmas Traditional Kit 


Starting with a plain cardstock 8”x7”
Score short side at 1”,  2.1/2”,  5” &  6.1/2”
Score long side at 4” &  5.1/2”

Fold all score marks and cut slits as per the photo below. 
Fold the small flap up to create a half box.


Decorate the back and front side panels with Holiday Floral + small front panel Ornaments + inside panels Berry Christmas. 
Finish off with some washi tape and a sentiment label topper.

I then used several off cuts, scraps and fussy cuts to create tags and other useful goodies that can be layered together to make clusters.

To make the rosettes, simply score a piece of 1”x10” paper every 1/2”. Fold it back and forth until it is all bunched up in your fingers, stick the ends together securely. *tip- use two circles punched out to adhere to the middle on front and back 
of the Rosette when spread out. This will help it stay together better than just one side. 


Visit my on FACEBOOK to keep up to date with my projects in real time 

Scrap Crazy with Toni