So excited to bring these simple projects with you today.. Anyone can follow along from beginners to the more advanced who like to bring it back to basics sometimes..
Let me know what you think! Thanks for your time, Happy Scrapping..
Recently the boys and I were able to enjoy some much needed quality time with friends on the Gold Coast.. We loved being able to walk around Cavill Ave on Surfers Paradise whenever we wanted..
I absolutely LOVED putting this base together!!
I used off cuts from a kit by Twitchit Craft Kits... I first lined the entire white cardstock with double sided tape and glue.. The layers each piece down starting at the bottom corner.. It was so much fun making each piece fit!
The title cutout is pre-cut from Scrapbook Fantasies..
Thanks so much for dropping by! Make sure you head on over to the Lasting Memories layout challenges website for more inspiration for our amazing DT!
Let your creativity flow and hope to see your linked up entry soon! Toni.. xoxo
Easy Plant lady layouts– made by Toni Herron for Twitchit Craft Kits
Plant Lady Kit
**view youtube video here**
Layout 1-
With
a plain 12”x12” white cardstock base, use a blending brush with your coordinating
ink and the stencil in the kit to add a fun diagonal pattern. Once you are
happy with your design, remove the stencil and continue extra free style blending
in the two corners.
Add two 4”x6” photos and then find some fun quotes and frames to cluster around
your photos from the Window Blooms and Buy The Plants pattern papers. *tip- to
give your layout dimension, layer your fussy cuts using foam tape.
Layout 2 -
With
a plain 12”x12” white cardstock base, use the “sploshing” technique on your background
– stamp an ink pad onto a piece of plastic, sprintz some water and swirl around
so there are no solid lines / edges. Then drip the colour and splosh this onto
your cardstock. Let dry or dab up the access with some tissue.
Hanging Plants 6”x12” + Cacti 2”x12” + Green Thumb 1.1/2”x8”
Place the red paper 2” down from the top of the layout and then the black cross
paper just under it. The blue strip paper will meet the left edge flush and go
across on top of the pattern papers join. Using two of the 3x4 journal cards
and a 4x4 journal card, create your eye catching design element on the right
side of the layout. A 5”x7” photo will feature perfectly in the middle of the
layout. I used a circle punch to cut out the “always choose kindness” journal
card and finished off the page with a flower from my stash.
Pot People layout– made by Toni Herron for Twitchit Craft Kits
Plady Lady Kit
This beautiful and fun layout took less than 30min to complete! Perfect
for a beginner scrapper or a back to basics style for the more advanced
scrapper. There is a video available if you wish to create along.
Starting
with 12”x12” white cardstock, I used the “sploshing” technique on the background
- stamp an ink pad onto a piece of plastic, sprintz some water and swirl around
so there are no solid lines / edges. Then drip the colour and splosh this onto
your cardstock. Distress and ink all edges of paper on this layout.
Window Blooms 3.1/2”x9.1/2” + Buy The Plants 3.1/2”x9.1/2”
+ Cacti 3.1/2”x9.1/2”
Stick down the three pattern paper with a mismatch height on your layout. This
creates a fun element that will catch the eye over the layout.
Using two 4”x6” photos, place them mismatch
height side by side also. In the space
at the top right, add a 3x4 journal tag. Then in the space at the bottom left,
I used a piece of Green Thumb 3x4 and then added a tag with scraps of the same
paper.
Finish off the layout with some twine on the tag and flowers to create mini
clusters.
Scraps Cards – made by Toni Herron for Twitchit Craft Kits
Christmas Traditional Kit
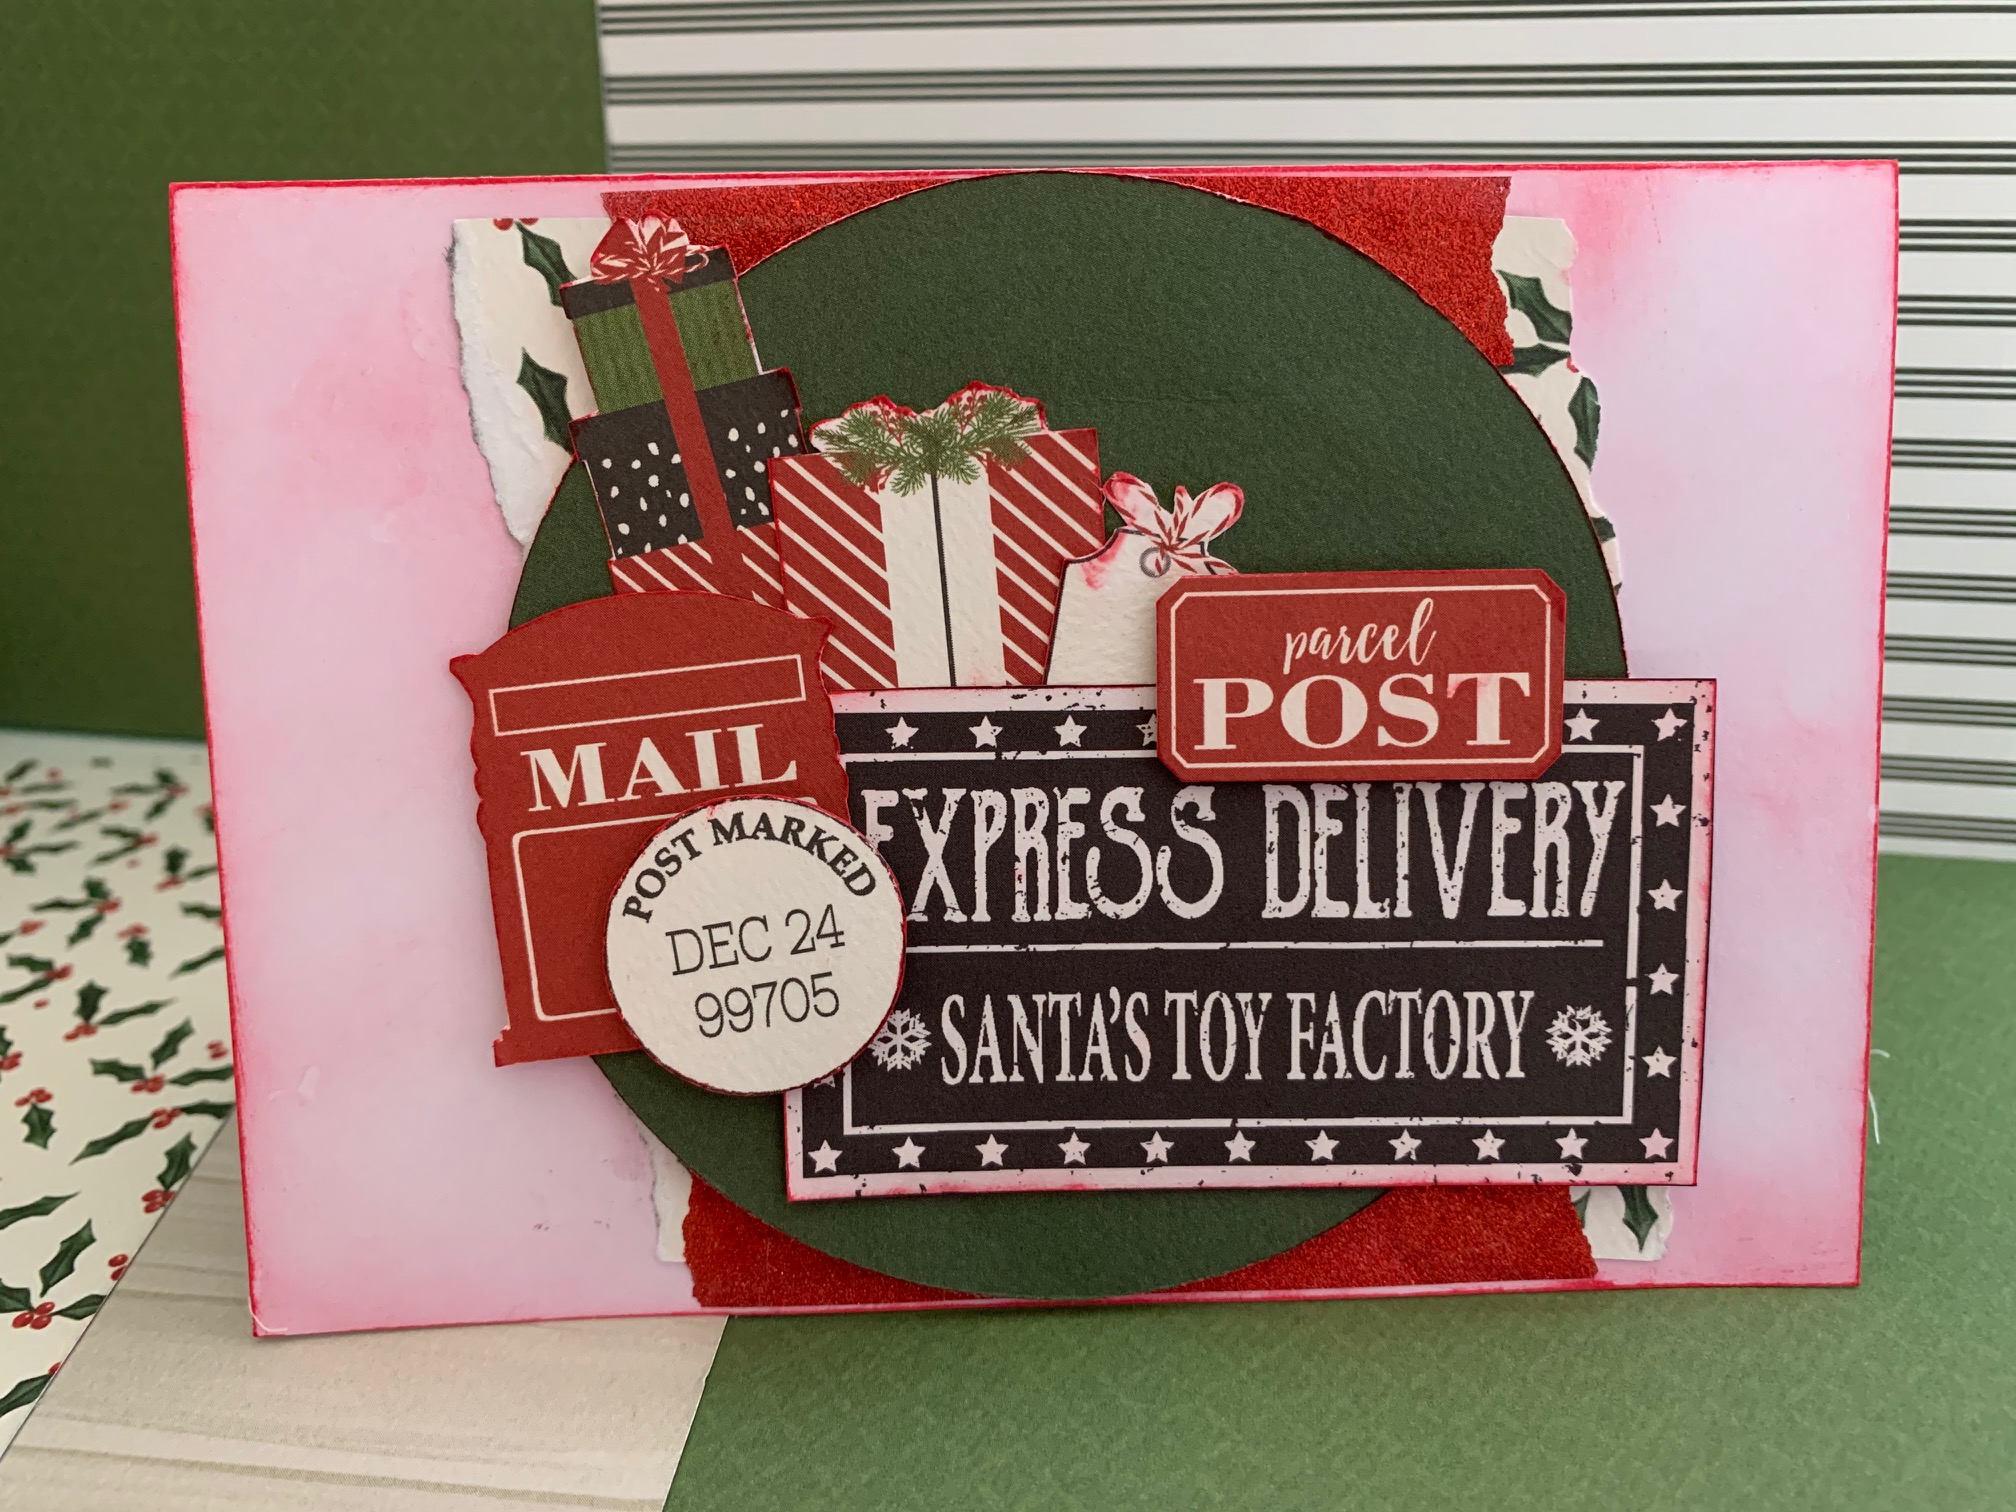
These cards
are so easy and perfect to use up all the fiddly bits leftover from kits.
Starting off
with plain cardstock to create your usual card base. I used an A4 piece and cut
in half at 5.3/4”. This then folded in half creates the card base at 5.3/4”x4”.
Heavily ink the edges of the card base.
Card topper-
use a larger piece of cardstock from your scraps box. *tip- doesn’t matter what
colour or pattern as it is about to be covered- 5.1/2”x3.3/4”. Stick double sided tape / glue
to fully cover as much as possible. Now using all of your kit scraps, place
each piece randomly to cover the whole topper base. It will look a little like
a mismatch quilt design. Once the whole
base is covered, cut the overhang from the edges. Use some foam tape / 3D dots /
cardboard behind and adhere to the card base. This will give a fun dimensional
element to the card. Place a tag, fussy cut pieces or sentiment to the front of
the card topper to finish off.
6 simple and easy Scrapbooking layouts – made by Toni Herron for Twitchit Craft Kits
Christmas Traditional Kit
This layout is all about layers and a large cluster, using only paper found in the Christmas kit.
*tip- Begin by fussy cutting everything out from your bonus mystery sheets. This makes designing and placing your cluster pieces much easier and quicker later on.
Start by cutting a large circle from your base pattern paper using a circle cutter / electric cutting machine / tracing a plate towards the bottom left side– Ornaments approx. 9” diameter. Flip the circle over, the reverse side will be included in the layered design.
Holiday Floral – cut to fit over the hole 9.1/4”x10”
Woodgrain- is your next layered piece. This sits vertically on the left, about 1” from the side. It is roughly 3” wide and I have torn both long sides.
Place your pattern circle on top of this, roughly in the middle of the 12” layout so it is off centre to the layers. I have included a 5”x7” photo insert. You are able to use whatever size photo suits your needs.
To make the layout pop, use foam tape / 3D dots to raise your cluster elements. I have used fussy cuts from the bonus sheets, stickers from the sticker sheet and tags. *tip- lay all of your pieces before sticking them down. Take a photo with your phone, then use that as a guide to stick all pieces onto your layout. Creating dimension with foam tape as you go.
More simple layouts - 45min to make!
On a white cardstock base, use a plate or circle template, trace around to make a simple wreath design. Then get a bit messy to create a fun background. I used the "sploshing" technique -stamp an ink pad onto a piece of plastic, spritz some water and swirl around so there are no solid lines / edges. Then dip and splosh this onto your cardstock. Let dry or dab up the access with some tissue.
Grab loads of stickers from the sticker sheet included in the kit and place them randomly to creative a long cluster over the wreath lines. *tip- use foam tape / 3D dots to add a dimension element to the page. To finish off the layout I added a 5"x7" photo insert and a title under it.
Layers are what makes these layouts so quick and easy. Without adding anything, we can create several fun and fast layouts using only what is in the kit. Base - Holly Berries 12"x12"
Header & Footer layer - Holiday Floral 3.1/2"x12". Tear at 1" long ways to give two pieces. Place the thinner piece at the top and the larger piece on the bottom. This is act as a pocket for the tags.
Fussy cut out all your tags on the pattern paper and randomly place them along the bottom red paper. Tuck some under and place some on top. Use foam tape / 3D dots to add dimension. I have included a 6"x8" photo insert, however this would look great with either 2 or 3 4"x6" photos side by side.
This was another fun layout that I made using the very last 12"x12" paper in my kit - Wreaths.
I torn a circle hole in the middle and rolled the edges out to make a window design. Using the reverse of the paper, I have the cute wreaths just poking out the back. I added some solid red by sliding in an off cut of Holiday Floral also. I used a 4"x6" photo insert and added my cluster of tags, fussy cuts and stickers on top in the left side, tucked under the main 12"x12" pattern paper. There is still so much more that you can do with this layout. Please feel free to add!!!! *tip- make this design your own by adding a journaling element, title and even some clusters hanging over the outside of the window hole.
Start with adding a white cardstock base for this layout.
Cut a 1" frame all the way around using Festive Florals. From that, cut another square 10"x10". Place this piece on the reverse side in the middle. Create a photo flap, so you can have 3 photos on the layout. On on top and two when flap is lifted. I have used 4.3/4"x6.3/4 photo insert (5x7 trimmed down) however, you can make this flap to suit any size photos you are using.
I used some red ink spray to add some colour and then finished off the layout with a 9.3/4" x 3.1/2" journal mat and embellishment cluster.
Box with 3 cards– made by Toni Herron for Twitchit Craft Kits
Christmas Traditional Kit
Bottom box –
DK Green / Woodgrain 8.1/4”x10.1/4”.
Score short side at 1”, 2”, 6.1/4” & 7.1/4”.
Score long side at 1”, 2”, 8.1/4” & 9.1/4.
Fold, cut and stick together to create box shape.
Lid- Plain cardstock
8.3/8”x10.3/8” *tip- for perfect fit
over bottom box, add extra 1/8” to the centre measurements. Score one side at a
time at 1” & 2” then rotate and repeat on all 4 sides. This will automatically give you
the extra 1/8” in the centre. Fold, cut and stick together to create box shape.
Card Topper –
Poinsettias 4.1/4”x8.1/4” + Woodgrain 6”x3.3/4”
+ 2 Red/Green 1”x6.1/4”
Score Poinsettia pattern piece at 1” on the two short ends, this will cover the
top and hang over the box ends to decorate those two sides. Add the two Red
pieces to the long sides of the box. I then added a long sentiment strip from
the sticker sheet and used a circle punch to create two half circles for finger
hole grips, making it easier to slide open the box.
Add some double sided foam tape or chipboard under the Woodgrain pattern piece
and still onto the top. Then I added some Gauze and created an embellishment cluster
with the Ute & Tree from the sticker sheet. Plus a tag and sentiment piece from
the bonus mystery sheets. I inked all edges of the top box.
PROJECT TWO-
Start with 3 plain cardstock at 4”x12”
OR regular A4 cut in half. Now fold each into a card base.
1.Woodgrain 5.1/2”x3.3/4” + using scrap piece of Poinsettia – tear on left
side.
Ink around card base and all pieces to be used on card.
Stick patten paper down to make your card topped base.
Add washi tape and fussy cut pieces to create a cluster.
2. Ornaments 5.1/2”x3.3/4” (use B side)
Ink around card base and all pieces to be used on card.
Stick down pattern paper.
Add Gauze and fussy cut pieces to create a cluster
3. Red/Green (cut out a circle) +
Poinsettia off cuts
Using a blending brush, add a distressed ink look to the
base of the card. Then build your topper on to the circle.
Ink around all pieces to be used on card.
Firstly I placed the circle and added the torn pattern pieces behind and added
washi tape to hide any gaps.
Fully adhere all of these before adding fussy cut pieces to create a cluster.
*tip- add foam tape / 3D dots / chipboard to pop the layers.
Twinchie card, Tag Holder, Flag Garland– made by Toni Herron for Twitchit Craft Kits
Christmas Traditional Kit
PROJECT ONE –
Twinchie card
Starting with a plain cardstock 6”x12” - Fold this in half to make a 6”x6” card
base.
Distress and Ink around all edges of pieces to be used on this card.
For the first layer of squares, cut all 9 pieces to 1/8” under 2” = 1.7/8”x1.7/8”
(use off cut pieces)
Second layer of squares, cut all 6 to 1/8” under first layer – 1.3/4”x1./34” (use off cut pieces)
Lay them
onto your card to create a topper design. Move and rotate pieces until happy with
how they are laid out. Stick down the first layer then add some foam tape / 3D
dots / cardboard to make the second layer pop to give dimension. Finish off
card with some tags and stickers from the sticker sheet in the kit.
PROJECT TWO –
Flag Garland
Bottom layer RED – 14 Red/Green 1.1/2”x2”
Middle layer GREEN – 14 Red/Green 1.1/4”x1.3/4”
Top layer WHITE WITH STRIPE – 14 Twenty Five Days 1”x1.1/2”
Cut a small 1/2" tail in each flag piece. Do this on ALL layers.
Now stick all layers together making 14 full flag pieces.
Add each letter from the “MERRY
CHRISTMAS” stickers on just a little bit lower from the top edge. This leaves
room to poke some holes into each banner on the top sides and threading twine back
and forth to create a hanging garland.
PROJECT
THREE- Accordion Tag Holder
Accordion -
Festive Florals 6”x10”
Score long side at 2.1/2”, 5” & 7.1/2
Score short side at 4.1/2 – fold this up to make a pocket.
Add a brad
onto the far left and right sides to secure the bottom flap up.
Add some washi tape for decoration.
Fill with tags from Christmas Tags pattern paper and fussy cuts from the bonus
mystery sheets.