Tuesday, December 1, 2020

Grab and Go box with cards - Christmas - Twitchit Craft Kits

  Grab & Go box with cards– made by Toni Herron for Twitchit Craft Kits


Christmas Traditional Kit 


This is definitely one of the easiest open topped boxes you’ll ever put together.

Start off with a plain cardstock 12”x7.1/4”

Score the long side at 4.1/2”,  5.3/4”,  10.1/4” &  11.1/2”

Score the short side at 6”  &  7.1/4”

Fold all of the score lines, cut slits into the score lines on the bottom, now wrap the panels until they make a box. Glue the extra flap closed on the long edge. Bring up and glue the bottom panels to create a base. The box is now complete. 


For the cards to be easily seen and picked up, draw and cut a diagonal line across the top of the side panels. From back to front, by 1”

Decorate- Twenty Five Days 5.3/4”x4.1/4” + 2 Red/Green 1”x5.3/4” + Holiday Floral 4.1/1”x4.3/4

Ink all pieces to be used on this project. Finish off with a strip of washi tape on the back. 


PROJECT TWO – simple 5 minute cards

Starting with a plain cardstock 5.3/4”x8”  *tip A4 cut in half is perfect for a card base of 5.3/4”x4”

1.      Poinsettia 5.1/2”x3.3/4” + torn Holiday Floral *1.1/2x5.1/2”

Stick down the Poinsettia pattern paper as the first layer on the bottom. Then using some scraps, I have torn the edges of the red pattern paper. Stick down a strip on top of each card and finish off with a tag. Ink all edges. Use foam tape / 3D dots or cardboard to give the tags some dimension


      2Woodgrain 5.1/2”x3.3/4” + Holiday Floral 4.1/2”x3.1/4” + scraps for strips Twenty Five days and Red/Green and Berry Christmas

 Stick down the Woodgrain as the first layer.

 Create your topper as a second part. 

Using the red pattern paper as the base for the topper, glue down the strips of scrap papers onto the left side. Using some foam tape / 3D dots / cardboard added to the back of the sentiment piece. You can also use the foam tape to the back of the topper also to give extra dimension layers to this card. Ink all edges. 


3.    Woodgrain 5.1/2”x3.3/4” + Holiday Floral 5.1/2”x1” + Acetate 5.3/4”x4”

Measure down 1” from the middle crease. Cut the card there. Add Acetate to the inside of the flap panel to equal the length of the missing card. Add washi to the back of this panel.

On the front, add a pattern paper layer and washi over the top of the cut. Choose a sticker from the sticker sheet included in the kit, place it in the middle to replicate an invisible card front.

Stick the woodgrain to the inside of the card. This will create a background for the sticker on the front. 


Visit my on FACEBOOK to keep up to date with my projects in real time 

Scrap Crazy with Toni  

Monday, November 30, 2020

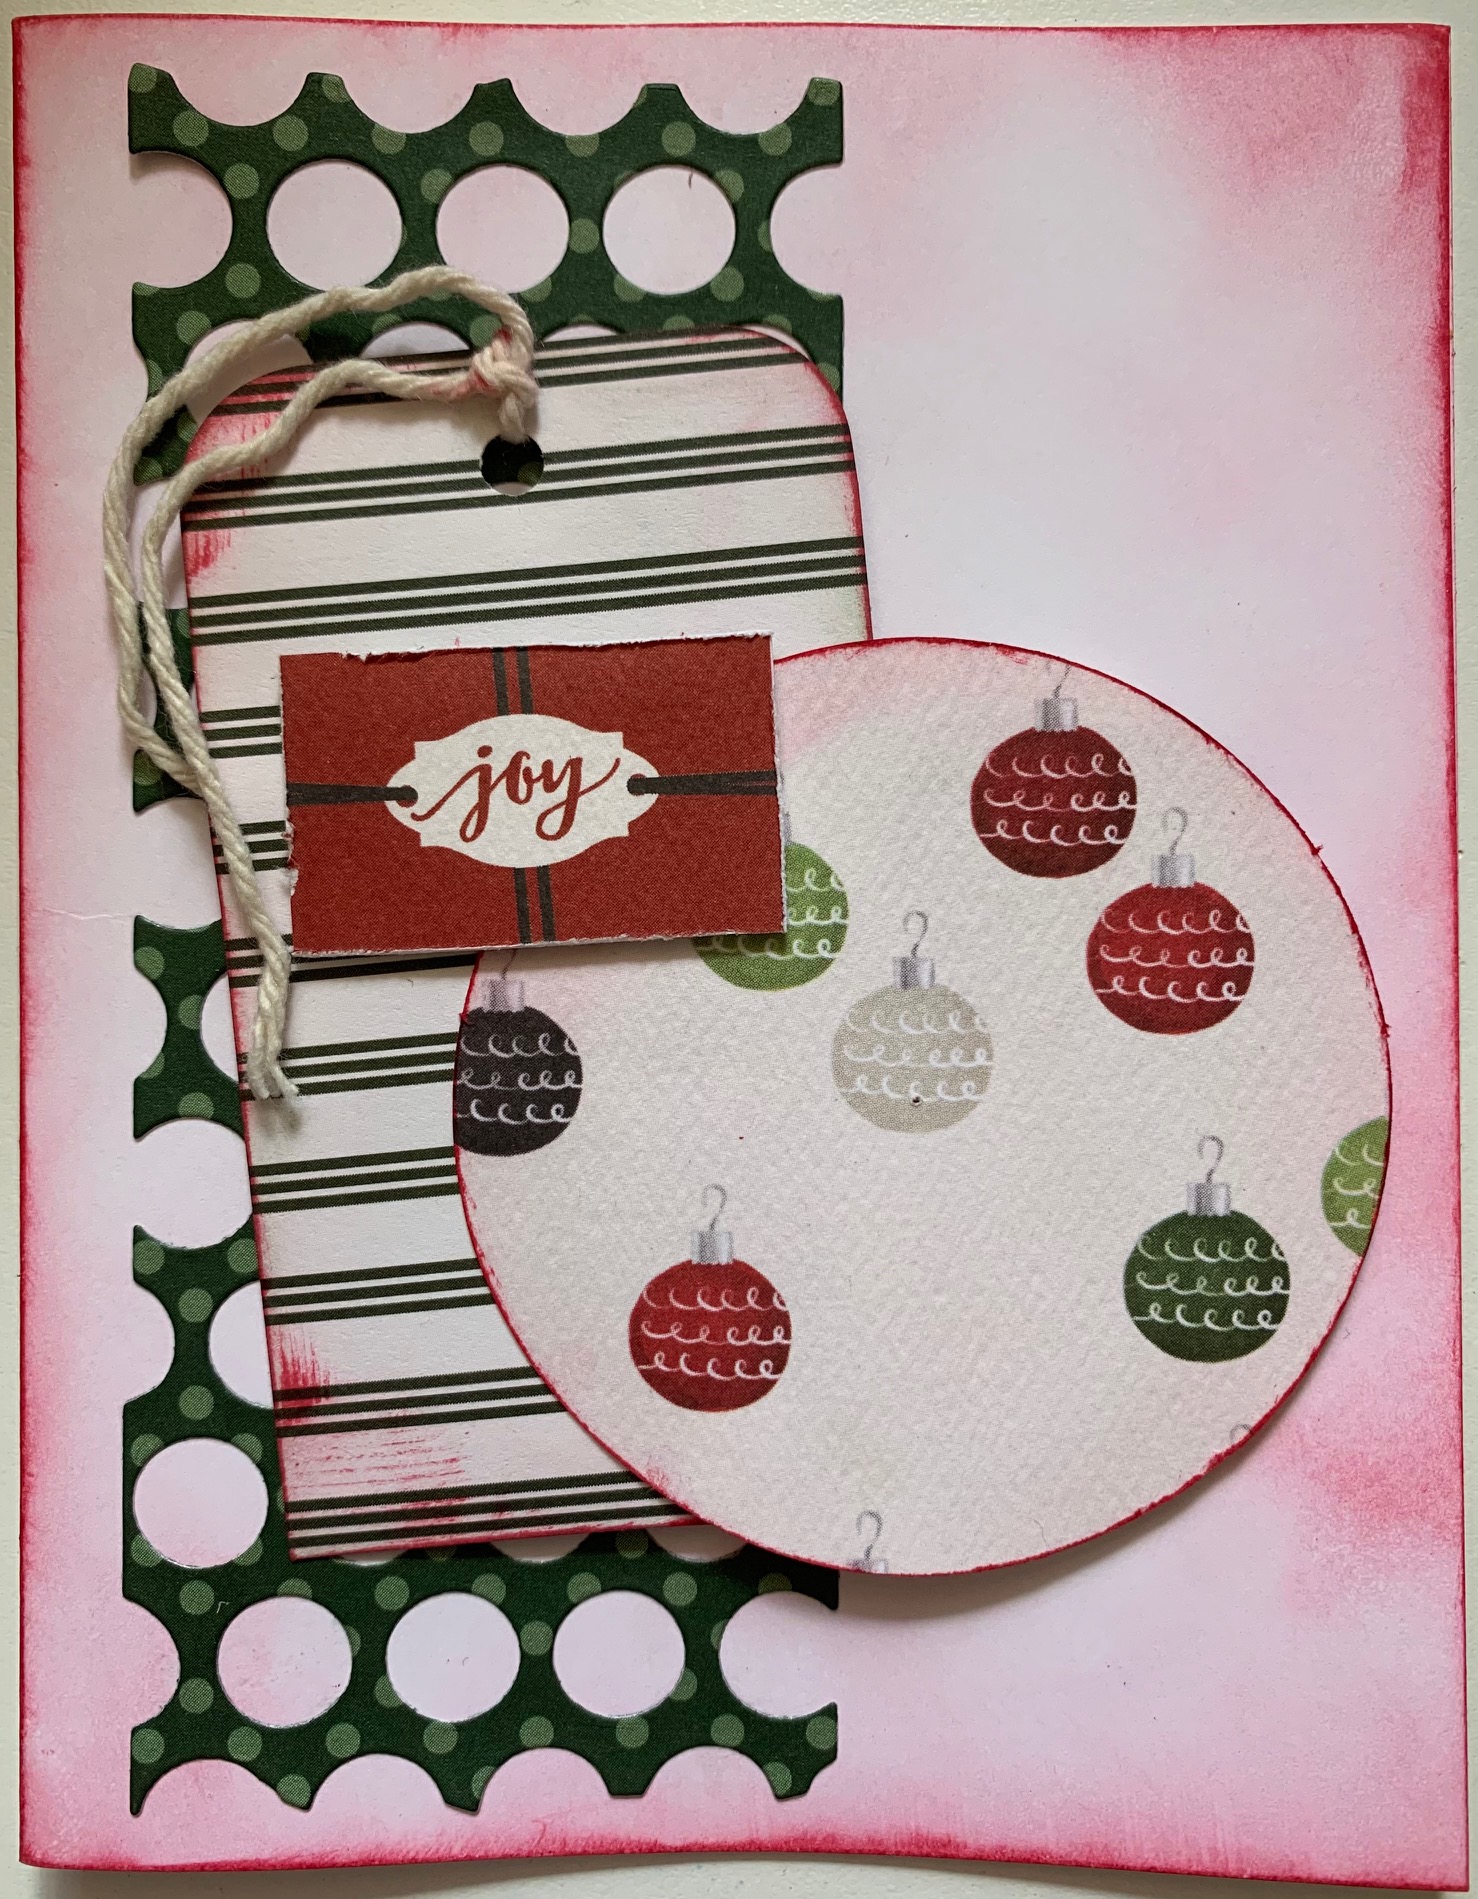
Simple diecut cards using scraps - Christmas - Twitchit Craft Kits

 ** – made by Toni Herron for Twitchit Craft Kits


Christmas Traditional Kit 


Each card is designed to use up as many scraps as possible. You may add so much more to these cards as you like. Go crazy and really fill them up! I have made these fairly simple so even a beginner can follow along.  

Start with plain cardstock to create your usual card base. I used an A4 piece and cut in half at 5.3/4”. This then folded in half creates the card base at 5.3/4”x4”.

Choose which metal dies you would like to use and search through your scraps to find pieces that will suit in size. Run through whatever machine you have Big Shot / Cuttlebug / etc..

I made four cards, all with a distress inked background. I did this with a blending brush.


Dies I used were from Sizzix, Couture Creations and a freebie in a Creative Cardmaking magazine.


Add toppers like tags, fussy cuts, sentiments, washi tape. I even turned the off cut into a second card with a shaker.

You are only limited by your own imagination. So have fun with these! 


Visit my on FACEBOOK to keep up to date with my projects in real time 

Scrap Crazy with Toni  

Tuesday, November 24, 2020

Shaker cards - Christmas - Twitchit Craft Kits

Shaker cards – made by Toni Herron for Twitchit Craft Kits


Christmas Traditional Kit 


Shaker Box - Ornaments 4.1/2”x6.1/2” + Holiday Florals 4.1/2”x6.1/2”. Score around each edge at 1/4 “.  

Cut a 1” frame from the Baubles pattern paper and add Acetate to the inside to create a window. This will become the front of your card.  Ink all edges with a Red ink.  Add a sentiment piece to the middle of the red pattern piece.
Use both pieces and glue 3 sides together. Add shaker bling / confetti into the forth side before sticking together also. *tip- to secure the box sides while drying, I wrapped some washi tape across the box to hold it all together.  Add another sentiment to the front of the card. I used a “Christmas” fussy cut label from the bonus mystery sheets that came in the kit.

Using leftover Ornaments pattern paper I have added a flap card to the back. This was about 1/2" short, so added washi tape over the exposed piece to hide the gap.  When you wish to write your personalised Christmas note, please add in your own white cardstock. I would recommend one measuring 1” smaller as this will match up with the 1” frame on the front.  


PROJECT TWO: Starting with a plain cardstock 4”x12” - Fold this in half to make a normal base at 6”x4”.

Shaker card topper – Holiday Floral 5.3/4”x3.3/4” + Ornaments 5.1/2”x3.1/2”.
I distressed and inked all edges on this card.  Using a circle cutter / metal die / traced cup – Cut out a centre piece and add Acetate to the back to create a window. Use doubled foam tape or some sort of 3D pops around the circle on the backside of the acetate.  Add the foam tape to the edges of the Bauble paper.  *tip- I lay this topper facing down to add the shaker bling / confetti to the middle of the circle. I then add the red pattern piece carefully on top, paying close attention to keeping my layers neat. Then flip over and your card topper is ready to stick to the plain card base.  Now add any sentiments or embellishment clusters to the front of the card window. 


Visit my on FACEBOOK to keep up to date with my projects in real time 

Scrap Crazy with Toni   

Lasting Memories 525 - Pink flower mood board

DT Button

525 - mood board


SMILE


Over the past 6 months or so, I have been very lucky to have been allowed to facebook stark a few family and friends for their photos... I have loved being able to use them, that it's given me a fresh joy and spark with my crafting.. 
This layout features my cousin and her little girl.. 


Paper from the "my secret love" collection by Couture Creation..
The ribbon diecut come ready cut from Cut For You, I added the pattern paper behind it..


First I cut the boarder pattern paper and cut a hole from the white cardstock that won't be seen, so I can use it for layering..
I used the next layer on top of the pp and again, cut a hole from both pp and cardstock that won't be seen.. more layering... lots of simple layering!

I used the ribbon cut to judge where the ink sploshes would look best behind the cut... I actually have one glued on the bottom, and the second set popped up with some foam tape..
The pretty pink paper under the photo is actually the opposite side of the leafy paper.. :)

Using the hot pink glitter alphas and dots for the center of the ribbons, I was able to capture that bright brilliant colour in the mood board..


What do you think?

 Thank you very much for joining me today and I'm so excited to be able to share with you all the creations for the Lasting Memories Design Team! 
I really hope that you will drop by the blog and check out the inspiration from the rest of the team members and then get creative to link up your own entry.. 

Thanks again, Toni.. xoxo


Scrap Crazy @ Facebook -
https://www.facebook.com/scrapcrazy.customcreations/


Saturday, November 21, 2020

Easel card – Christmas - Twitchit Craft Kits


Easel card – made by Toni Herron for Twitchit Craft Kits


Christmas Traditional Kit

**view youtube video here** 

Starting with a plain cardstock 12”x4” - Fold this in half to make a normal card base at 6”x4”.
Then fold the top flap in half again. Your card topper will be glued to the front piece of the mountain.

A picture containing calendar

Description automatically generated


 Card Topper - Berry Christmas 6”x4” + Holly Berries 5.3/4 “x 3.3/4 “ + Red/Green 4”x3.1/8” + Sentiment

This topper is assembled with layers and matting in two parts. The polka dot base of the card topper first, with the tree pattern piece on top. Using foam tape as the divider, the top part has a red base with the fussy cut sentiment from the Bonus Mystery sheets provided in the kit. 
Using a piece of off-cut attach a small piece of Red/ Green 4”x3” to the back of the card.


Inside card – Berry Christmas 6”x4” + Red/Green 3.3/4”x1.1/2” + Holly Berries 3.3/4”x3.3/4” + White flap  
                   with personal message 3.3/4”x7.1/2”


The inside of this card has been made with three parts. First is the polka dot base. Next using a long piece of white card stock, fold it in half and attach tree pattern paper. This will stick towards the top. Leaving a gap down the bottom for a small piece of Red paper, use foam tape to pop it off the card and attach some stickers for a cluster embellishment. To make the card sit in an Easel position, simply slide the topper between the two bottom layers. 


Visit my on FACEBOOK to keep up to date with my projects in real time 
Scrap Crazy with Toni 

Tuesday, November 3, 2020

Lasting Memories - 522 - soft floral mood board

DT Button

#522 - mood board


sweet


I have had such fun with the challenges lately, again I've decided to jump in with other DT members to create this weeks challenge also cause I love this mood board feel soooo much!!

This beautiful sweet little girl, eating this sweet icecream is my cousins little girl... She is adorable and perfect for this paper collection.. 


I wanted to keep the feeling of this layout quite classic in it's design, so only added white, soft pink and gold elements to it... Although, I did add a soft aqua doily to the layers to blend in the colours..

The Memory Maze chipboard title piece has been inked with Gold and the golden glitter paper arrows from a Kaiser diecut..
Prima and Kaiser flowers, a beautiful feather and leaf die cuts make up the clusters..
Some ink sploshes and bling dots finish off the page..


What do you think?

 Thank you very much for joining me today and I'm so excited to be able to share with you all the creations for the Lasting Memories Design Team! 
I really hope that you will drop by the blog and check out the inspiration from the rest of the team members and then get creative to link up your own entry.. 

Thanks again, Toni.. xoxo


Scrap Crazy @ Facebook -
https://www.facebook.com/scrapcrazy.customcreations/

Monday, November 2, 2020

White With One - Caramel Latte

White..with 1

It's definitely warming up here in Australia, but it's always the perfect time for coffee and some natural fibers.. 
This months mood board looks fabulous and I know you'll have a blast looking though the DT inspiration so much that you'll want to get started on your own layout asap.. 
Caramel Latte is a soft but strong colour, it very reminds me of the outback at the end of the day.. LOVE IT! 

2019


Using a really fun cut out from Scrapbook Fantasies, I created this page with this as the design point.. 
I found some pattern paper and cardstock that matched the Caramel Latte colour perfectly, along with some Caramel alcohol ink too.. 

Making the back of the layout I actually found quite a relaxing experience!
I usually get a little stressed with these dies as the fussy cutting makes me twitch a little, lol.. But cause this was all straight lined, I loved it!!!!


Taking full advantage of the very small amount of black we are allowed to use, I drew a couple of lines, inked the title and lightly rubbed some on the base with the blending brush.. 


The photo is of my boys with The Flash character at Movie World in December 2019 over the school holidays.. 


What do you think?

 Thank you very much for joining me today and I'm so excited to be able to share with you all the creations for the White With One challenge this month. 
I really hope that you will drop by the blog and check out the inspiration from the rest of the team members and then get creative to link up your own entry TO OUR FACEBOOK PAGE!
 
Your imagination is your only limit.. Just add a dash of colour to your white layout.. 
Thanks again, Toni.. xoxo


Scrap Crazy @ Facebook -
https://www.facebook.com/scrapcrazy.customcreations/