Wednesday, February 25, 2015

A quick make for time poor scrappers

Welcome back, Welcome back...
To all of my crafty friends that have been sending their wishes and prayers lately to myself and my family and my whole community during the time of the Cat5 Cyclone, I thank you all very much from the bottom of my heart!
There were some scary moments, but we've all managed to come out the other side alive and unharmed.. We have sustained some damage, but nothing major to our house / shed.. However our yard full of truly beautiful big trees have been demolished.. It looks very bare!
 
Anyway, during this situation my post for the Memory Maze team was approaching very quickly.. I didn't have much time to be creative lately as the clean up and recovery comes first..
However last night I sat down to my table fairly late and started on my make..
I was totally overwhelmed with TOO MUCH supplies and TOO MANY ideas!
 
So I emptied my desk and started from scratch..
 
In this post I am going to share with you the 5 very simple steps it took to create this quick layout.. It's perfect for time poor crafters, beginners or advanced scrappers that need a back to basics project to "reset" their lacking mojo..
OR this would be great at your next crop or retreat session..
 
1. Splatter the base cardstock with mist or paint.
*I used a paint brush dipped in Red mist
 
2. Cut up your chosen MM chippie design, paint / colour it.*I used Tim Holtz BLACK crackle paint and Dimentional Magic over the top.
 
3. Place MM chippie in positions so they will pop out from under your photos. *Best to have a play with the photos and the chipboard before you actually stick these down. I used glue. Also, remember to wait until it's all dry until you place anything to minimise smudges!
 
 
4. Stick down photos. (use an Acetate overlay also if you wish) *I used a cute Kaiser film strip set overlay of my photos. I love this effect!
 
The photos feature my big boy Lane playing AFL for the U13's Yeppoon Swans in the finals.. Yes, they are the 2014 Grand Final Champions!
 
 
5. Complete your layout with other embellishments as you wish.. (Additional MM chipboards / flowers / bling / title / journaling)
*I heat embossed an AFL ball MM chippie..
 
 
Easy - DONE in under 1 hour! :)
 
The Memory Maze chipboard I used were from my very old stash.. However they do have loads of fun new designs that would look even better on your creations!!
 
Lastly, my post wouldn't be finished if I didn't share with you a photo of Hunter assisting with the creative process of this layout..
 
 
Thanks for stopping by.. Toni..


Saturday, February 14, 2015

Memory Maze fun with Dry Embossing and Gelatos

Today I had a chance to finally get around to having a play with a piece of Memory Maze chipboard using a couple of new techniques that I haven't tried yet.. 
So I just wanted to quickly share my progress..
 
I started off with the "Mum" chipboard.. It's a nice thick piece that is great for a title..
I chose this piece in particular so that it will go onto a creation sometime in the future..  
 
I have never tried to dry emboss chipboard before, but have been wanting to for a little while..
So I pulled out the Big Shot and this cute new embossing folder and gave it a go..
*Tip - Be careful and don't force your folder! I now have an imprint of half a "M" before I realised and quickly reversed it back out of the roller.. oops.. lol
 
Next, I lightly covered with some gesso to give it a nice white base..
As I've never used the Gelato's, I wasn't sure if it would help brighten the colour..
*Tip - I don't think it really mattered to be honest.. lol

 
Now for the Gelato.. I used the Metallic Silver as the first coat and totally fell in love with the true colour that it gave..
*Tip - I just used my finger to rub the colour to give a nice even coat..
Lesson learnt - I tried to use the craft mat and use the Gelato as a Water Colour, however it didn't seem to work because of the gesso..

 
Next, I added the Metallic Melon and Metallic Mint colours to the raised embossed parts of the design... Again, just using my finger to rub it as per my liking..
*Tip - It's a good idea to redo some parts with the Silver, as the colours got a bit smudgy..

 
Finished project
Since I want to keep this piece for a future project, I didn't want to adhere it to anything just yet..
So here I've just laid it on top of a couple of cardstock mats so you can get the full effect and colours of the chipboard..

 
Thanks very much for joining me this afternoon.. I'm not 100% happy with the process a I had wanted to do a few more steps adding a technique with a stencil as well, but since the piece wasn't quite big enough I had to settle for trying out the extended version next time.. lol.. :)
 
I am happy with how it has turned out though, especially since it was my first attempt at the dry embossing chipboard AND my first time using Gelatos too..
I do think I'll be able to put this piece to good use soon! Although when I do, I think I might add some coordinating Kindy Glitz and some Dimensional Magic to really make it pop as a great feature.. 
Hope you're having a nice weekend.. Happy Valentine's Day, Toni.. :)


Thursday, February 5, 2015

Guess who made it onto the Memory Maze DT!!!!!

WOOOT WOOOOT... Yep, that's right - ME!!!!
 
I'm so excited to announce that I was super lucky enough to have been selected on my first manufacture DT... Memory Maze is by far my favourite Chipboard company and they are releasing many other products soon too, so I'm privileged to be able to showcase some of their goodies over the DT term..
 
The first project I want to share with you is one I just finished last night. It features a photo of myself and my big boy Lane at his grade 6 Graduation night last year.
 
 
Over on the MM blog, I have done a write up on the strange and weird process that I undertake during so any of my pages.. I start with one thing and end up with something completely different that what was in my head.. Usually it ends up for the best though.. lol..
 
The super cool Memory Maze chipboards I've used for this layout are Chicken Wire
- painted Silver with Ranger alcohol ink  
 
 
and the title "Mummy's Boy" - covered with Pinecone refiller ink.
 
Now for some quick close ups.
Some cute Kaiser flowers with Rub Rock-It Florets, Bakers Twine on top of the chipboard.
Underneath are some layers consisting of "Bluebird" 12x12 paper, tissue paper, Gesso, Basic Grey Pattern paper and Cream shimmer cardstock.
 
This side shows the gorgeous Prima "Say it with Crystals" that MY awesome Mummy gave me from her massive stash.. Stampin' Up Corduroy buttons, Kaiser journaling tag and Lily Bee Designs numbers..
To finish off the layout I added some Glossy Accents to the chipboards and Shimmerz "Buttercream" on the flowers..

 
Thanks for dropping by.. I still can't believe I've managed to some how get onto the awesome DT with Memory Maze!
The team are fantastic, lead by our courageous leader Sally who is constantly filled with inspiration and creativeness..


Sunday, January 11, 2015

Scrap the Girls - January

This month Scrap the Girls challenge blog have got a gorgeous sketch to start the new year.. As soon as I saw it, I knew that I didn't want to miss out on creating with it!
 
 
Angel
 
 
I had such fun making this layout with soft girlie colours.. It's not often I get to have fun with GIRLINESS since I have two boys that most of my scrapping is focused on.. But this gorgeous photo of one of the amazing teachers at my boys primary school deserves all the pretty goodness that I could throw at it.. lol.. :)

 
On the base there are a few sprays, two sets of texture pastes..
The embellishments are a bunch of mix matches that all somehow come together perfectly on the page.. I was truly having a "blessed" moment while making it.. I felt so overwhelmed that it was coming together so nicely and it actually felt easy.. I LOVED the process of making this page and in real life, it is beyond stunning...

 
This will probably be set onto a canvas and will be a present for the teacher in the photo, so haven't put any journaling on here, but have left the tags in a position so they can be used for journaling later.. Thanks for dropping by, now don't forget to head on over to the Scrap the Girls blog too..  


Friday, January 9, 2015

Scrapbook Fantasies - week 1

Hey Hey.. Back I am with my first challenge entry for the new year..
As usual Scrapbook Fantasies are right on top of their challenge releases and of course I'm "loving" their week 1 - 2015 idea... "Create a project using the word or theme of LOVE"..
 
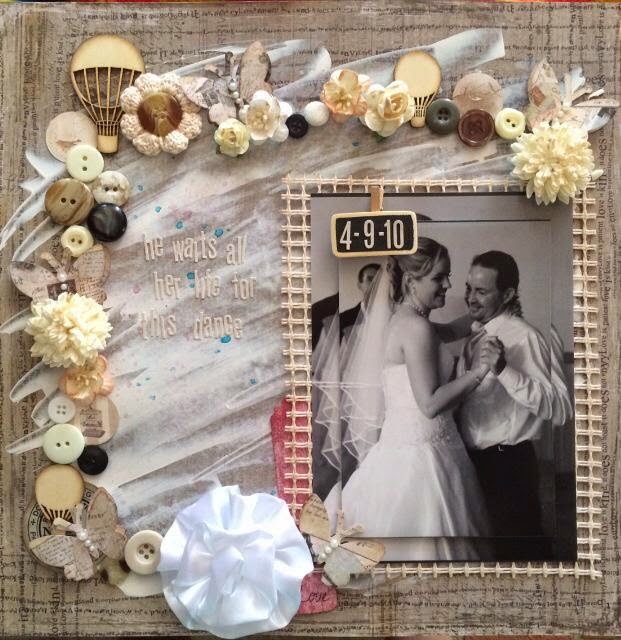
he waits all her life for this dance
 
 
This special layout features a photo of my cousin Aleesha and her Dad (my Uncle Ian), during their Father/Daughter dance at her wedding in 2010..
I have chosen to use very natural and soft tones for the embellishments so that they didn't overpower the beautiful black and white photo..
 
 
The one pop of colour that I've included on this layout is the tag under the photo.. It serves two purposes in fact.. The first is that it holds the "love" word aspect of the challenge requirement.. The second is that on the back of the tag I have wrote a lovely "father/daughter bond" poem.. 

 
The butterflies were punched from a punch that I picked up from my Mum's.. :)
The flowers are all random and I honestly don't know the manufacturers..
Plenty of buttons, pearls and shimmerz paint for that extra stunning little touch.. 


Wednesday, January 7, 2015

Quick Card Share

Howdy... It's been a week since my last post, so thought I'd jump on and quickly share with you a couple of cute cards and an ATC that I completed a couple days ago..
I really haven't done any other crafting.. The boys are keeping me busy being on school holidays.. :)
 
These are only simple, but serve the purpose and meet the themes..
 
"sports" ATC
 
 "Anything Goes" card..


"Fairy" card.. 
 
 
I'm hoping to get some more crafting done soon.... maybe.. lol..
Hope you're all enjoying the holidays too and getting much more craft time than I am.. :)
 
Don't forget to head on over to my facebook page for up to date craftiness, when it actually happens..

Monday, December 29, 2014

Application for Memory Maze DT

With great excitement and a bit of anxiousness, I'm applying to the Memory Maze DT for 2015..
I have always loved the MM chipboard and was really excited to have met owner Sally and her sister Jan at a crop in Rockhampton a few months ago.. I've kept in touch and updated on the blog and facebook pages since.. So when I saw the post go up for Applications for DT I knew straight away that this was something I wanted to take a giant leap towards..
No expectations of course, but hopeful! :)
 
The requirements have asked for me to share 6 of my favourite projects that I have used Chipboard to make.  I have chosen to share a few different style creations as I know that MM also have Stencils, blings and much more than just Chipboard..
 
First I'm actually going to show you two BRAND NEW makes only created today!
 1. This is untitled at the moment.. It features a MM Mannequin chipboard design.. The photo is of my Grandmother.. Dated 20th September 1961... This definitely has a "shabby chic" Mixed Media feel to it.. 
 

2. "Grandmother".. This features MM chipboard title word.. The photo is of my Mum and my oldest son at a wedding in 2009.. Some what a simple layout, but all of the embellishments pieced together with the pattern paper and chipboard make this an eye catching page.. The other chipboard is not a MM product, but does look simular to some of the goodies they manufacture. I actually cut this in half and separated the two parts.


3. Next is a Canvas I made featuring a large MM chipboard frame.. The photo is of my glamorous cousin Jackie.. I have not shared this project on my blog yet...   I kept the colours basic to match her dress.. The wire frame along with the flowers and butterflies definitely do this photo justice in my opinion!


4. This Beyond the Page isn't manufactured by MM, however it does have a MM chicken wire on it.. It also displays my use and LOVE for Beyond / Off the Page projects.. The photos are of my boys..

5. I've noticed that MM have been making quite a few Fairy goodies lately.. And of course, anyone who knows me, knows I'm obsessed with Fairies! I collect Fairies and have HUNDREDS! This is another Beyond the Page project.. A simple Shadow Box.. This isn't a MM manufactured product, but  hope it does show that I'm up to making any style project required..


6. The final layout is another page.. This features a MM chipboard frame in an unusual way.. It also showcasing the use of stencils and embellishments placed together to make the whole project pop...


Of course I could have shared these projects, but as Sally has already seen these in person I didn't want to include them in my 6.


Righto, well that's it for me.. I hope I've covered all that I was required to in this post. Please drop on by the Memory Maze blog to keep up to date on this awesome QUEENSLAND manufacturer!
It's hard for any Australian business to be to the standard of many International companies, but I can say I honestly believe this is one of the top Chipboard manufactures!
Even if I'm not chosen as a DT member, I will still happily buy and use their fantastic projects and proudly promote this local company.. :)