Tuesday, February 9, 2016

Swap Mini Album - Mister Fox

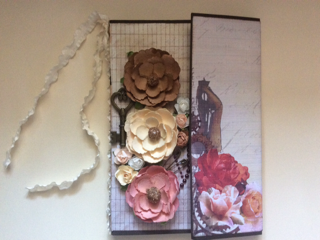
Even though I have made and shared these with you before, I decided to make another as I just couldn't bear to part with those.. This album that I have made especially for the swap.. Although I HAD made the others for this specific swap I just can't bring myself to post either one of them off.. lol.. So I made this one with a paper pad by Kaiser - Mister Fox that I'm not totally in love it, so mailing it off will not be such a hassle.. lol..
 

I have made this one the same as the others, however this only stands 6" tall instead of 6& half.. Any photos that might be added to this album will have to be cut down.. 
 
This photo is shows the first flap on the left side..
 
Underneath the next flap is a space for maybe a small photo and some journaling.. Then a tag is on the other side..
 
Now on to the right side.. The top flap actually has room for a tag or photo to fit under the tag at the bottom.. Then open it towards the left to add some more photos here..
 
Then lift that all towards the right and there is more room for photos..
 
Although I used a paper pad that I knew I would be able to safely part with, I do still very much like this album.. I promise it wont be staying put though, it is already in the envelope and heading to it's new home!! :)
 
Don't forget to drop on over to my facebook crafting page for more updates.. Thanks, Toni.. :)


Monday, February 8, 2016

February Swap Cards

 
Here are a couple of the swap cards I sent out this month..
2x Valentine's and 1x Paris theme..


Don't forget to drop by my Facebook crafting page to be kept up to date with all crafting... Thanks for visiting, happy crafting.. Toni.. xoxo


Friday, February 5, 2016

Butterfly Dreams Canvas

  Welcome back Memory Maze friends and chipboard lovers!
I am excited to bring to you today my first DT projects for 2016.. A truly lovely and girly canvas that actually has quite an airy feel to it - A matching card - And a layout that I had already shared a few days ago thrown in as an extra.. :)
 

 Butterfly Dreams


This canvas is approx. 12"x6" which made it perfect for some 6x6 pattern papers the brand new range out by Magnolia Lane.. I adhered the paper to the canvas using a Heavy Gel medium paste and then coated the top and added some strips of torn paper in the middle..
The next step was to lightly paint all over the canvas with gesso, lightly wipe some away - Spray with some mists, coat again with gesso and again lightly wipe away..
Then it was time to have some fun with a brand new Memory Maze stencil!! LOVE LOVE!! I used clear impasto for this, so it is difficult to see in the photos, but in real life it looks great! The design is a Diamond pattern.. 

 
The flowers are from the Adalyn collection by Couture Creations, plus that big white flower in the middle which I painted the centre Gold to match the butterfly.. I actually painted the Butterfly gold with Ranger Adirondack alcohol ink so it would match the centre of the mini flowers.. I continued this by painting a Gold rim on the edge of the canvas also..
 
The Butterfly Dreams circle and the hanging Hearts chipboard pieces were simply painted white with gesso.. The last additions to the canvas were the strip of pearls on the right side and the Memory Maze bling at the top..
 
Memory Maze products used;


Hanging Hearts


Matching CARD


 A simple card created with the leftovers..
This time I coloured the chipboard piece with some heat embossed powder.. Added a couple of flowers, the butterfly, gold rim edges and the pearl strips... This card took me no longer than 5 mins to complete.. Such a lovely and quick card!
 
 
Memory Maze product used;


 TOGETHER layout

One last layout to share with you.. I made this the other day and am loving it so much that I really wanted to share it with you again.. I have used a beautiful Memory Maze Doily piece.. Coated it black using Gelato and a paintbrush dripped in water.. Then spread some white gesso on top lightly..
I used only one piece of 12x12 pattern paper, one piece of 12x12 cardstock, gesso and impasto pastes for texture and the embellishments that you can see - Flowers and title letters.. It turned out much better than I thought it would.. lol..


Thank you so much for joining me today
Toni Herron
2016 Memory Maze DT Member 


Monday, February 1, 2016

6x4 Antiquities Album - designed by me..

For an upcoming swap, I designed this Mini Album.. It has loads of flaps so that photos or journaling can be added.. I searched around Pinterest and came up with concept myself.. I sort of meshed some together to suit my needs..


The front is embellished with Prima flowers, small Kaiser flowers, Bling swirl, a rustic style key &  clothes pin.. It closes with a Velco dot..
 
This is the inside as it's first opened.. All of the paper are matching from the same collection.. It came from an 8x8 paper pad..  each set of pattern paper I brought in by 1/4 inch each time.. So the brown is 6 & 1/2.. The first pattern paper is 6 & 1/4..
 
On the left there is a pocket for a tag at the back that will fit a cropped photo.. And two smaller one's towards the front, best for journaling..

 
The first middle flaps open to the left.. All of these are double sided and will fit 3x2 inch photos..
I love how you can get the college prints done at Big W which have the two small photos on the same piece of 6x4.. Makes life easy when a lot of photos are important to include.. 
 
Next two flaps open towards the right.. 
 
Again, another two open to the left.. This time it reveals a full length flap with two tags..  
 
It then opens to the right and the base is left blank for two a 6x4 photos (middle and open flap) 
 
 Close up of the front cluster..
 
Very simple products used to make this album.. The full specs are 6 and half inches x 12 inches when completely open.. 
 
I have actually really enjoyed making this album and do intend on making another soon! Now that I have worked out the measurements for myself, it will be much easier and quicker next time..
Thanks for dropping by today, I hope this has inspired you to create something special today!! Toni.. xoxo


Sunday, January 31, 2016

Girl themed Tri-Fold card

I tried to make a Tri Fold card a few years ago and have to be honest, I really didn't like it..
Since then and especially lately I have seen a revival of these cards and so made it a mission to make another and hopefully love it this time.. Thankfully I was successful within my own standards and really like how it has turned out..


Staying with my trend of trying to use up old paper pads, I managed to get three collections into this one card.. Kaiser - Butterfly Kisses & Violet Crush and the Bo Bunny Enchanted Garden ranges..
 
 
I kept the embellishments simple and added only cut out pattern paper, one flower and some twine
 
Perfect for a Pre-Teen girl I think.. BFF to BFF.. What do you think?

 
Thanks for dropping by today.. Come back soon for more of my crafting goodness.. Toni.. xoxo


Friday, January 29, 2016

123 Challenge - January

 
 I'm a bit excited to share with you today a layout that actually turned out WAY BETTER than I had expected.. lol.. It looks pretty amazing IRL.. :)
 
It is my entry into the January challenge over at the 123 Challenge Blog..


This layout was created with one purple cardstock base - it matches the dress I am wearing in the photo..
And one piece of newly released 12x12 Kaiser pattern paper.. I had to do a tiny bit of trimming to all of the squares to make them fit with a small purple frame showing..
 
 
For the texture part of the challenge I have included Gesso, Clear Impasto, Glossy Accents, distressed edges and because "texture" can sometimes be with the eyes not only by touch, I included some faux stitching around each pp block and glitter.. And the final touch for texture was depth - I did this by included the flowers, 3D'd the days of the week, title and the chipboard doily piece..


I used the word part of the challenge quite differently to what others have.. I have used a photo of ONLY myself and made the journaling about MYSELF... -- However, there is a twist ---
 
Me, Myself & I
2016; I am going to grab the HAPPY! I am taking it upon myself to make the year positive! So together, "me, myself & I" are looking forward to a great year ahead!
 
As it mentions in the journaling, I am taking the steps within myself to be positive.. Put out positive vibes and thoughts! I am no longer going to let bad or sad rule my reactions or decisions.. Every day I am going to make a great day! :)

Now back onto the 123 Challenge Blog... I believe they are having a DT call this month.. So if you're a lover of challenges, why not drop on over to the blog, check out the details and then send through an email to Alicia.. Good Luck!
 
Thank you for joining me today, I hope you've found some sort of inspiration from my layout too.. Toni.. xoxo

Interactive Super Card - Violet Crush


Trying to get back into the swing of things and so far I'm doing not to bad with my crafting.. I have been trying to use up some old stash of 6x6 paper pads.. Cause lets face it, don't we all have way too many of those suckers! lol..
 
Anyway, I found this awesome card fold on Pinterest, not sure what it's called (maybe
"Interactive Super Card" ??? This is what that poster called it..
Anyway, I love it.. So wanted to give it a go myself.. Of course, like normal I didn't go searching for a tutorial, I just winged it and figured it out from the photo..
 
 
This the inside of the card, standing..
 
 
I used the old Kaiser collection - Violet Crush..
 
 
Securing the card shut with a Velco dot..  I couldn't see in the Pinterest one how they closed it, so just improvised with what I thought would be best.. I definitely needed something to keep it closer properly..
 
Here is the back side (flipped over) view of the card..
 
With scraps I was able to whip this little beauty up.. I was having a lot of fun with the layers..
What do you think?  Cards perfect for a teenage girl maybe?!?!?! :)